When working on a presentation, time is often of the essence. Editing individual slides to maintain consistency can be tedious and prone to errors. Fortunately, PowerPoint’s Slide Master View offers a powerful solution by allowing you to edit multiple slides using a single “master” slide. This feature is especially useful when you want to apply changes across your entire presentation without the hassle of editing each slide individually.
What is Slide Master View?
Slide Master View is a special feature in PowerPoint that lets you edit multiple slides using a single slide. This master slide controls the overall design elements of your presentation, including the fonts, colors, and positioning of key elements. By making changes to the Slide Master, you can ensure that these changes are applied uniformly across all slides, saving you time and ensuring consistency.
How to Access Slide Master View?
To access Slide Master View, follow these simple steps:
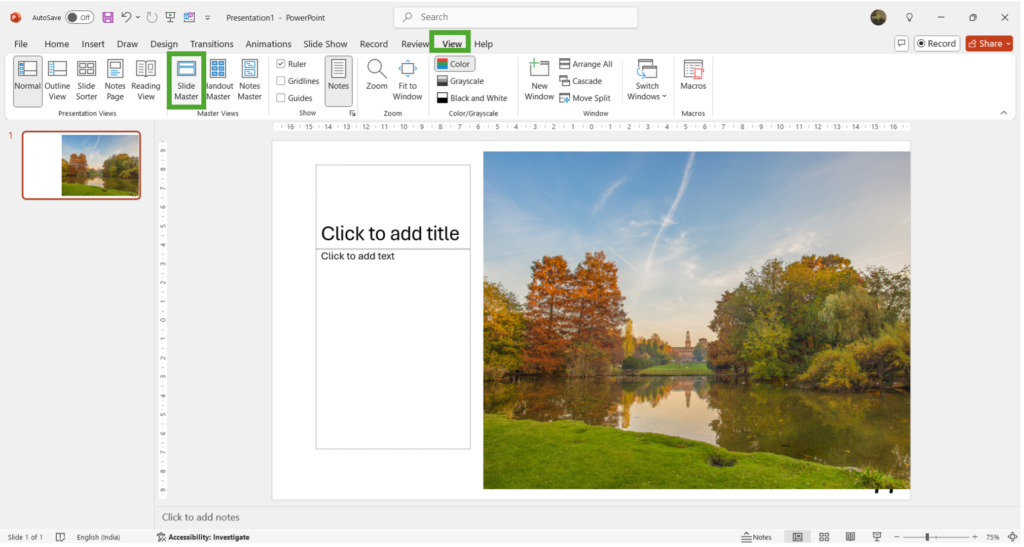
- Go to the View tab on the PowerPoint ribbon.
- Click on Slide Master.
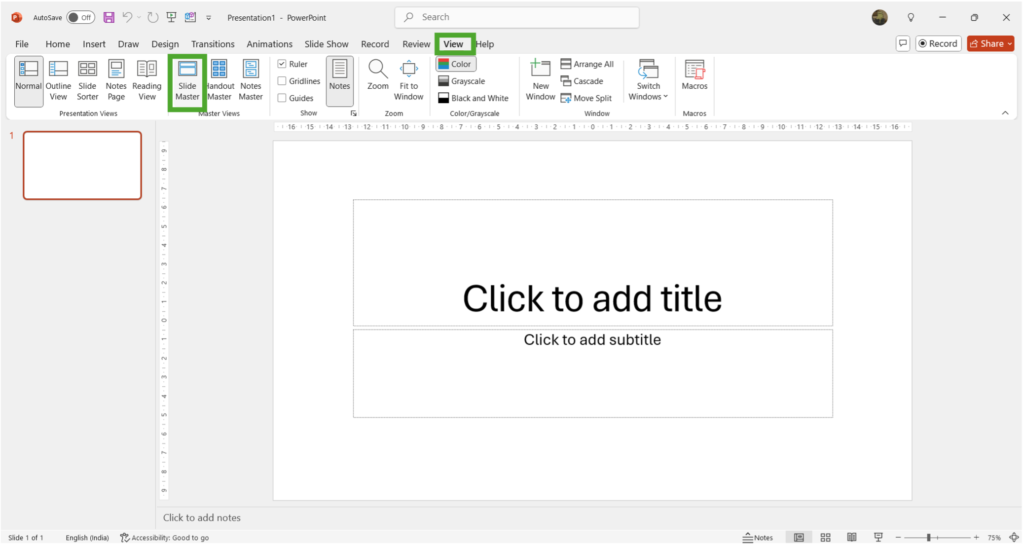
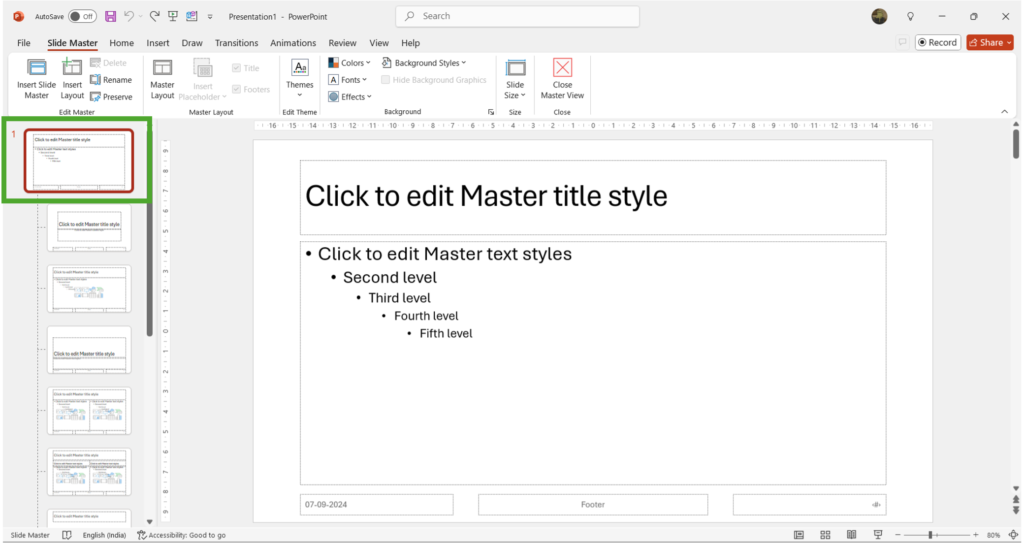
This will open the Slide Master View, where you’ll see the main Theme Slide Master at the top of the left pane, along with individual Slide Layouts beneath it. These layouts control the design of specific types of slides in your presentation.
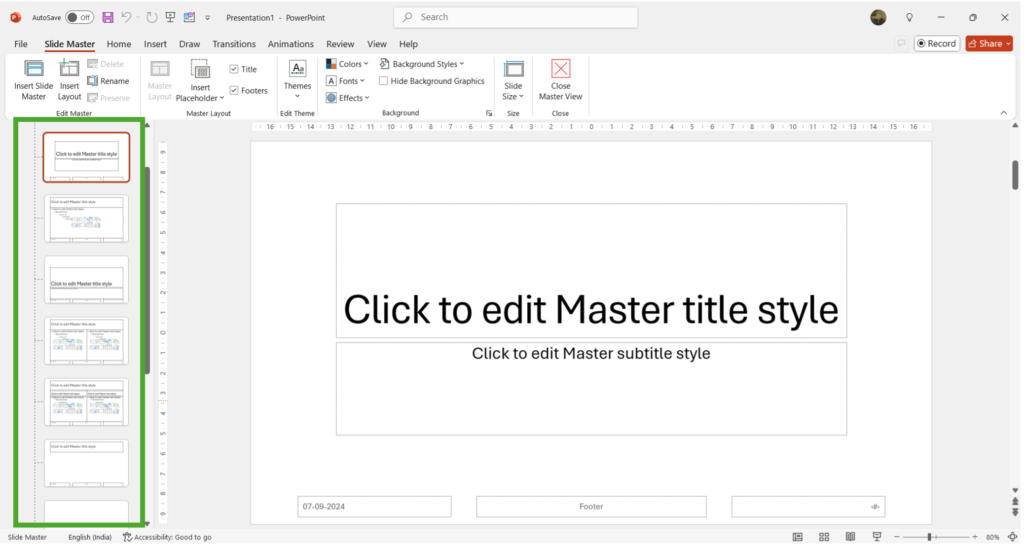
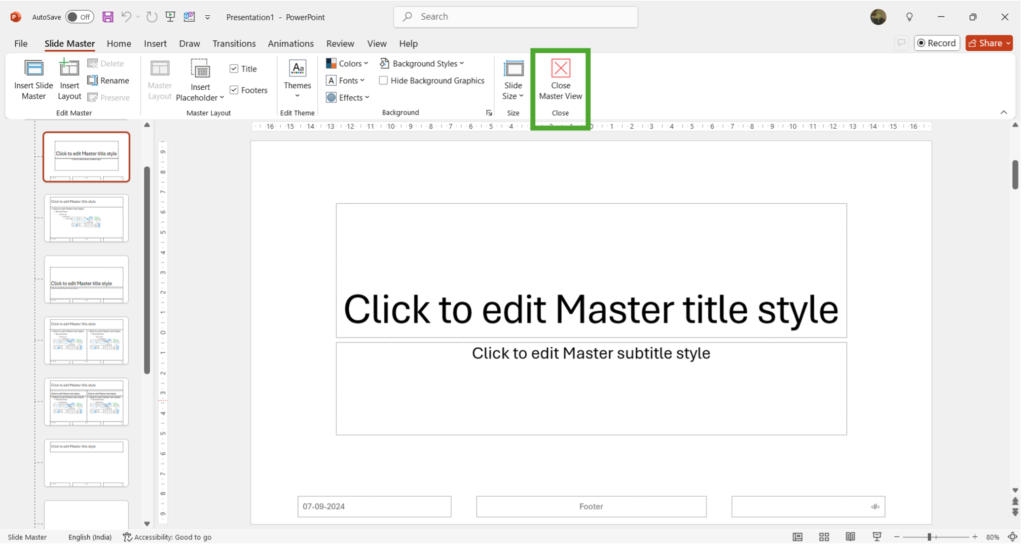
To Exit Slide Master View: Click on “Close Master View”
**
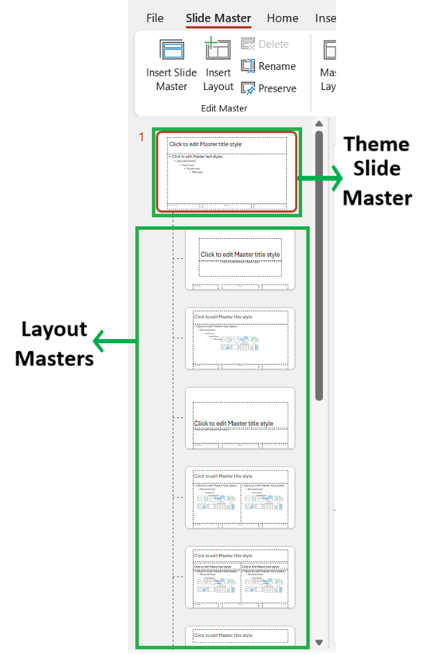
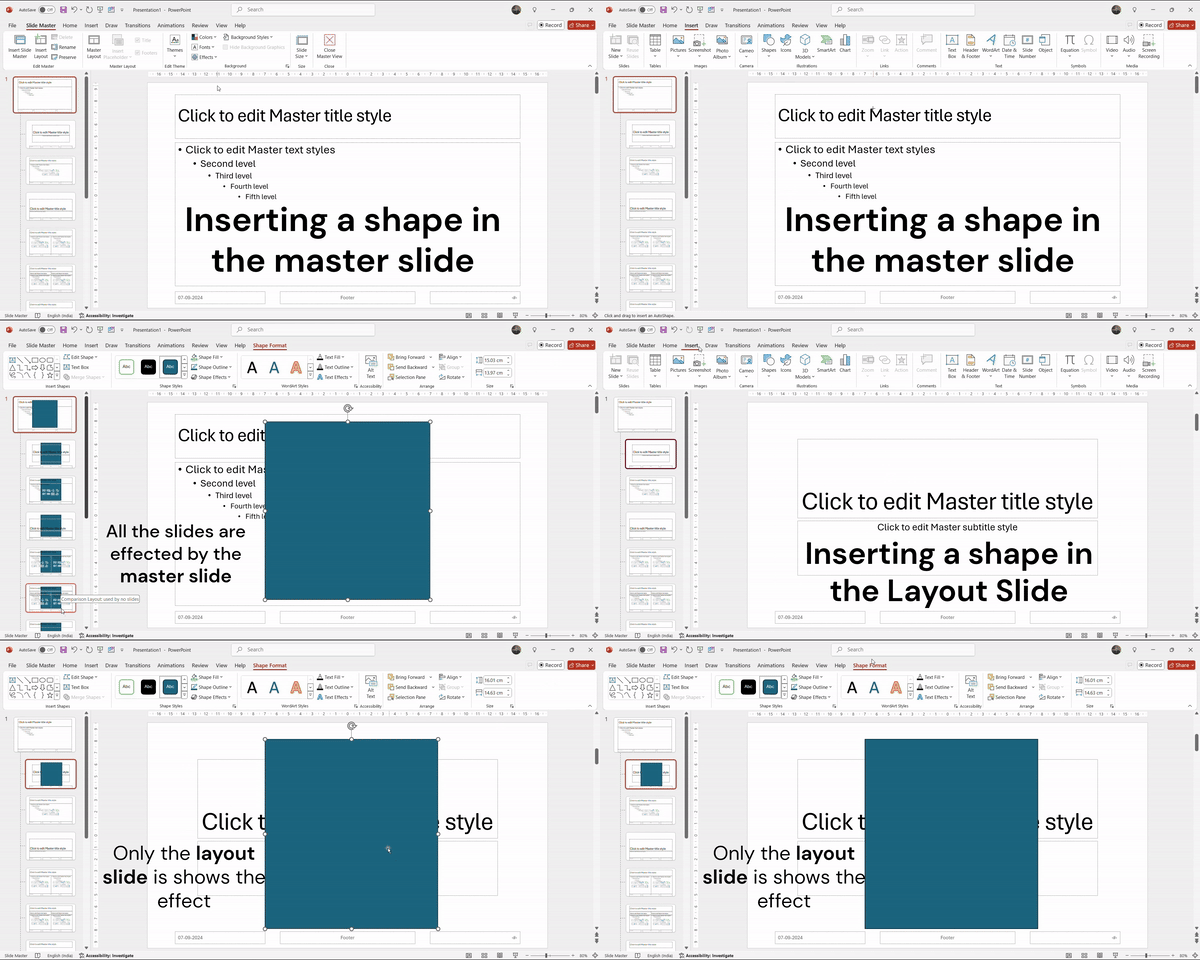
Theme Slide Master vs. Layout Masters
| Theme Slide Master | Layout Slides |
| Theme Slide Master is the top-level slide in the Slide Master View, and it serves as the “master template” for your entire presentation. It controls the overall look and feel of your presentation, including Fonts, Colors, Backgrounds, Logo/Graphics | Layout Slides are the individual slide templates that exist under the Slide Master in the Slide Master View. Each Layout Slide is a variation of the Slide Master, tailored for specific types of content. |
| When you make changes to the Slide Master, these changes will apply to all slides in your presentation that are based on that master. This is useful for maintaining a consistent design throughout your presentation. | Each Layout Slide inherits the general design elements from the Slide Master (e.g., fonts, colors, and background). However, you can customize each Layout Slide individually. For instance, you can move or resize placeholders, hide certain elements, or add new elements specific to that layout. |
| The Slide Master ensures consistency across the entire presentation | Layout Slides allow you to tailor the design to different types of content. |
*
Adding Consistent Elements Across Your Presentation
Imagine you’re working on a presentation for a small business and want to add their logo to each slide. Doing this manually can be both time-consuming and prone to errors, especially if you need the logo to appear in the exact same position on every slide.
- In Slide Master View, select the main Theme Slide Master at the top of the left pane.
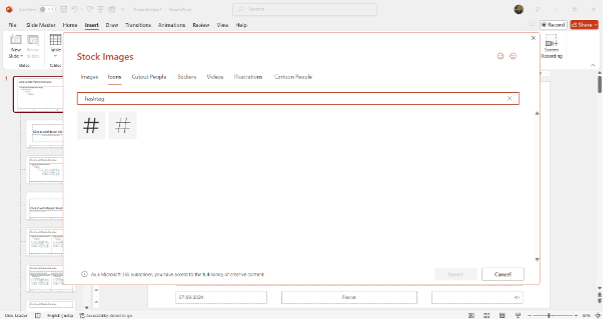
- Go to the Insert tab, click on Pictures, and choose the logo you want to add.
- Resize and position the logo as needed.
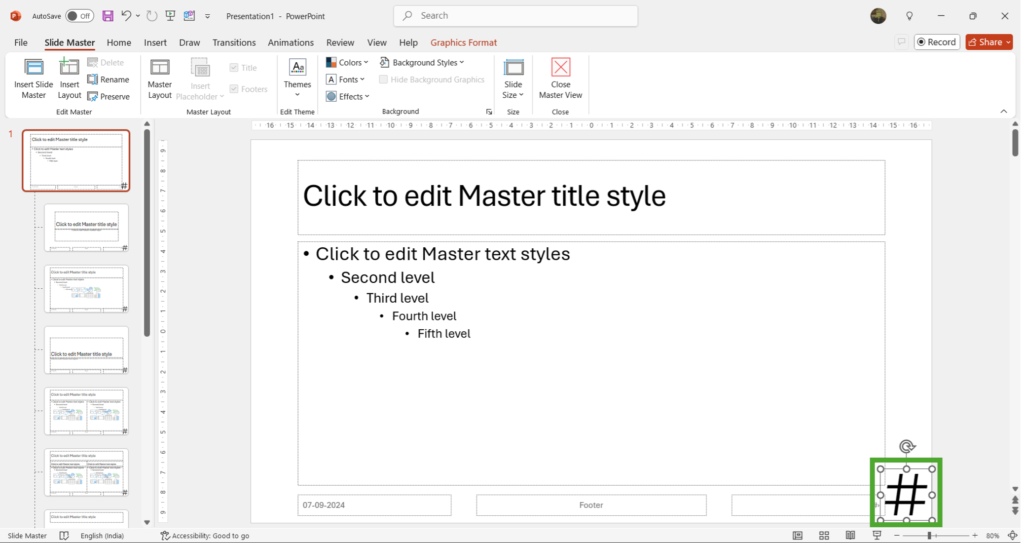
By doing this, the logo will appear on every slide in the same position, saving you the trouble of adding and positioning it manually on each slide.
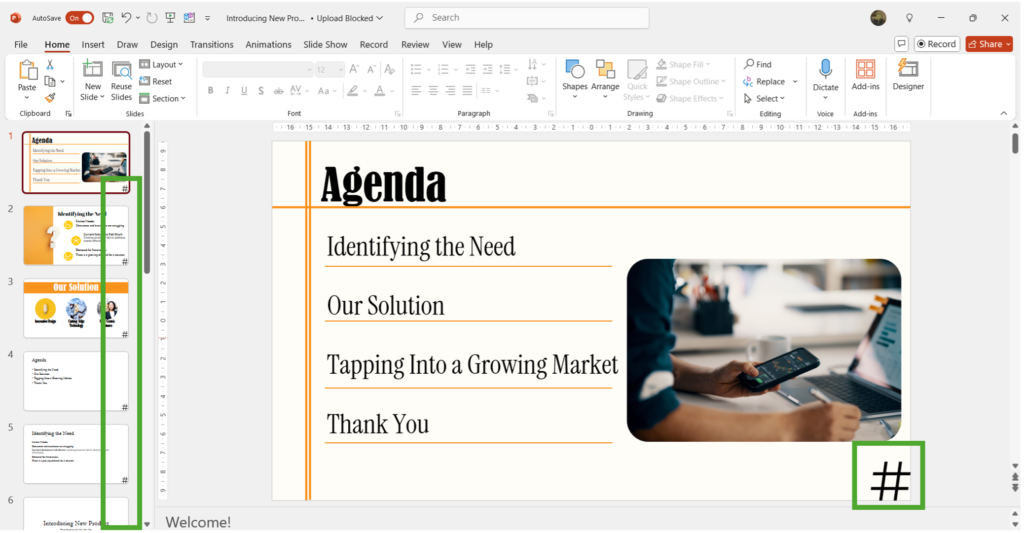
(The logo is visible on each slide of the presentation)
**
Customizing Fonts and Colors with Slide Master
Slide Master View also allows you to customize the fonts and colors for your entire presentation. This is particularly useful if you’re working within specific brand guidelines.
To change the master font styles:
- In Slide Master View, select the main Theme Slide Master.
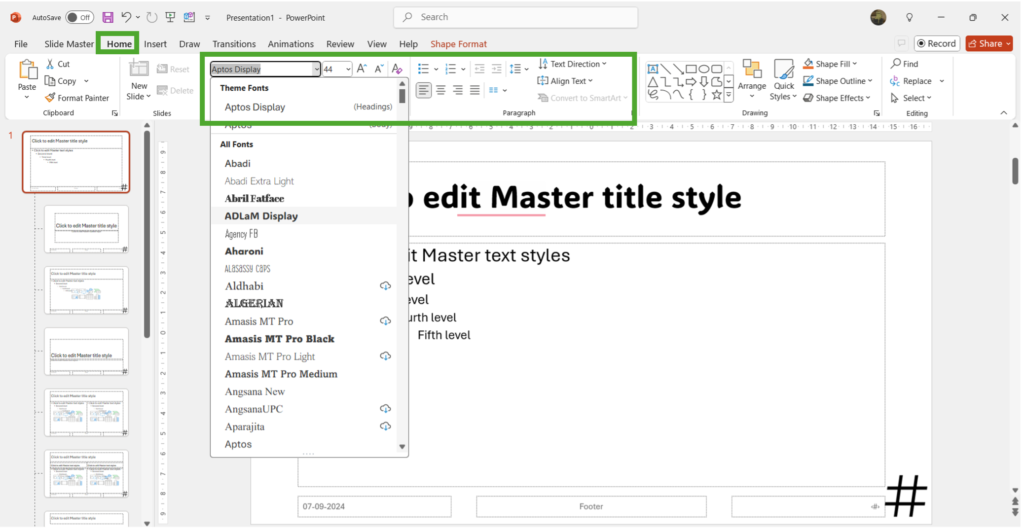
- Highlight the text or text box you want to change. (In the illustration below, we selected the title text box.)
- Use the formatting options to select a new font or color scheme. This can be done from the home tab where more options are given.
Or from the Slide Master Tab
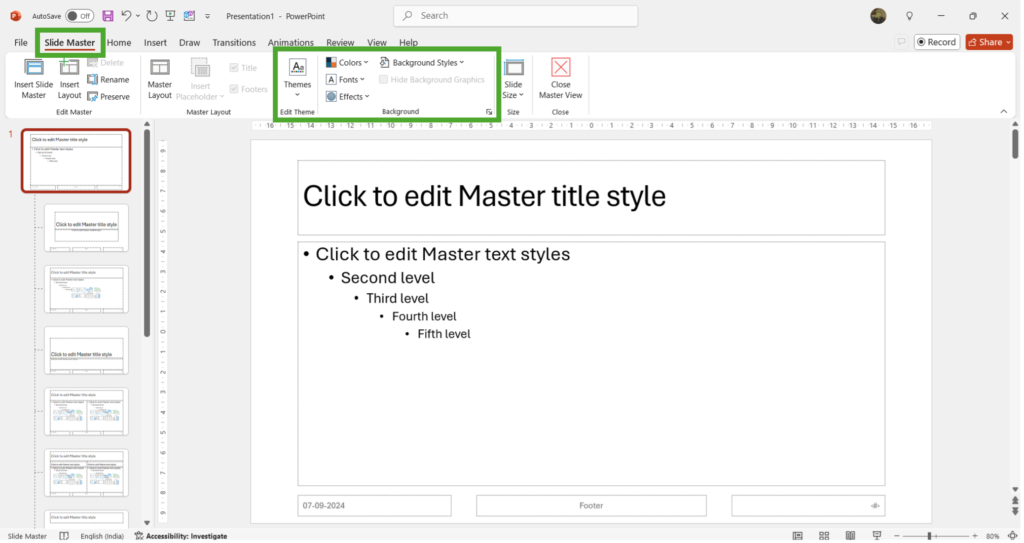
These changes will then be applied to all slides, ensuring that your presentation maintains a consistent look.

(Before)
(After)
The color scheme and fonts are consistent throughout the presentation.
**
Fixing Layout Issues with Slide Master
Sometimes, despite your best efforts, elements like logos or text boxes might overlap with other content on certain slides. Slide Master View makes it easy to fix these issues by adjusting individual slide layouts.
For example, if your logo is obscured by content on some slides:
- Navigate to the specific layout that needs adjusting in the Slide Master View.
(Logo is hidden by the image)
- Move or resize placeholders as needed to ensure everything fits perfectly.
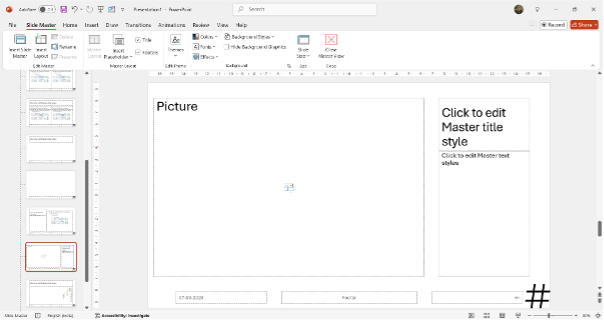
(Switching the positions of the picture and text placeholders)
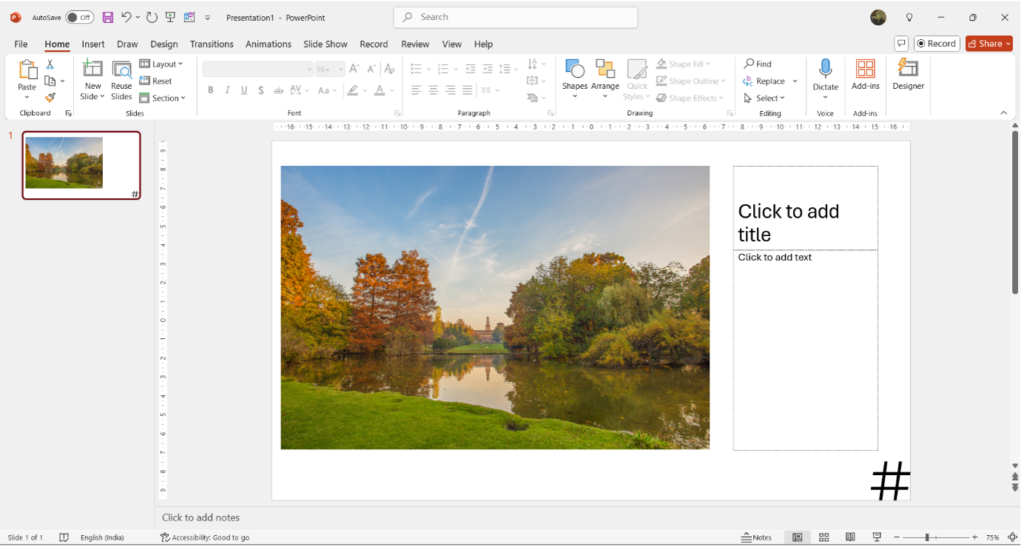
(The simple switch of positions is an easy and quick fix to the earlier issue)
Additionally, if a logo or other graphic is missing from specific layouts, this might be because PowerPoint automatically hides background graphics for those layouts. You can uncheck the “Hide Background Graphics” option to ensure your logo appears, though be mindful that this might introduce other unwanted graphics.
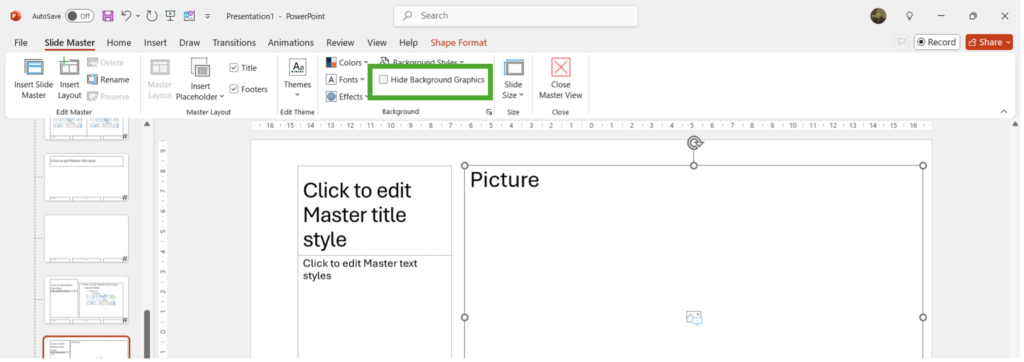
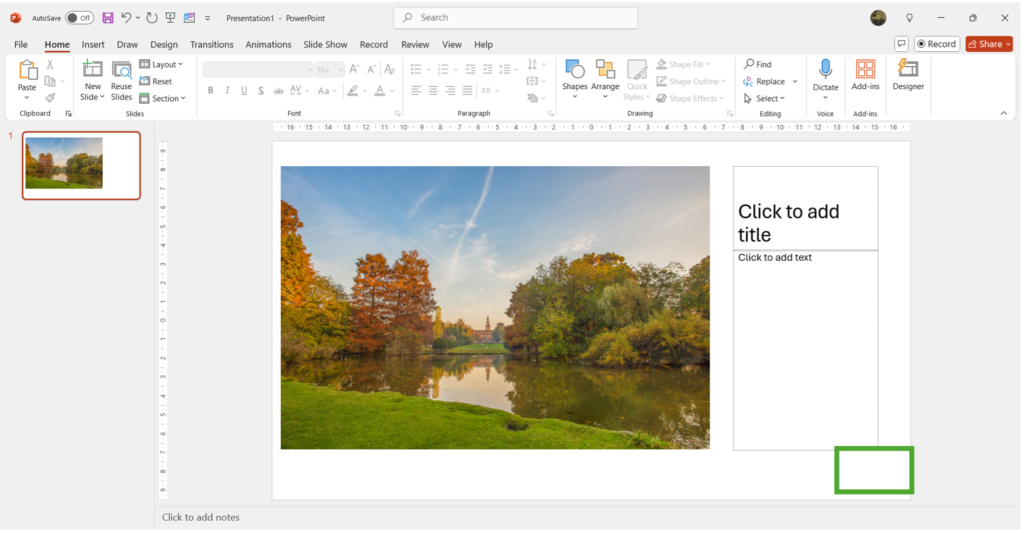
(The Logo/Graphic is now hidden)
**
Creating Custom Layouts with Slide Master
If the existing slide layouts don’t meet your needs, you can create your own custom layouts in Slide Master View. This is particularly useful if you want to create a unique design that isn’t available in the default layouts.
- In Slide Master View, click on Insert Layout in the Slide Master tab.
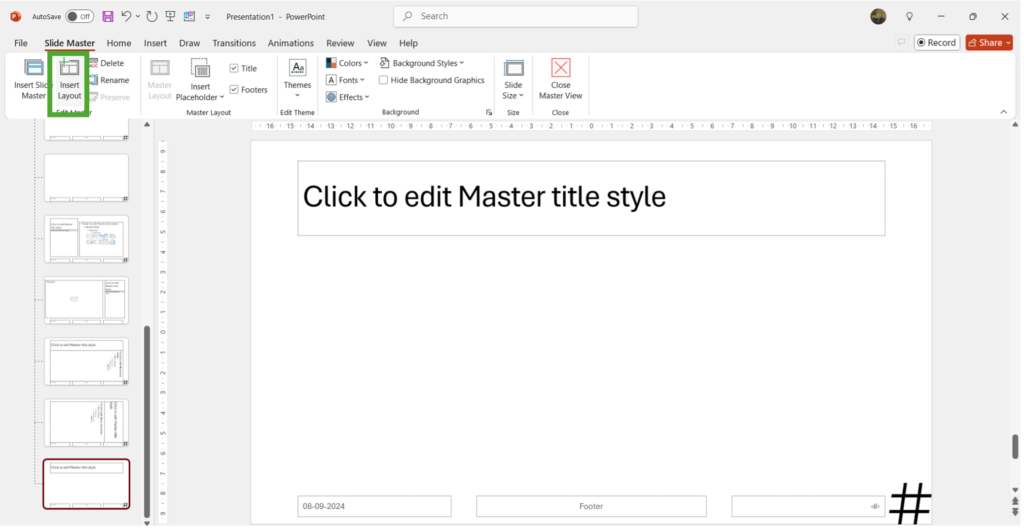
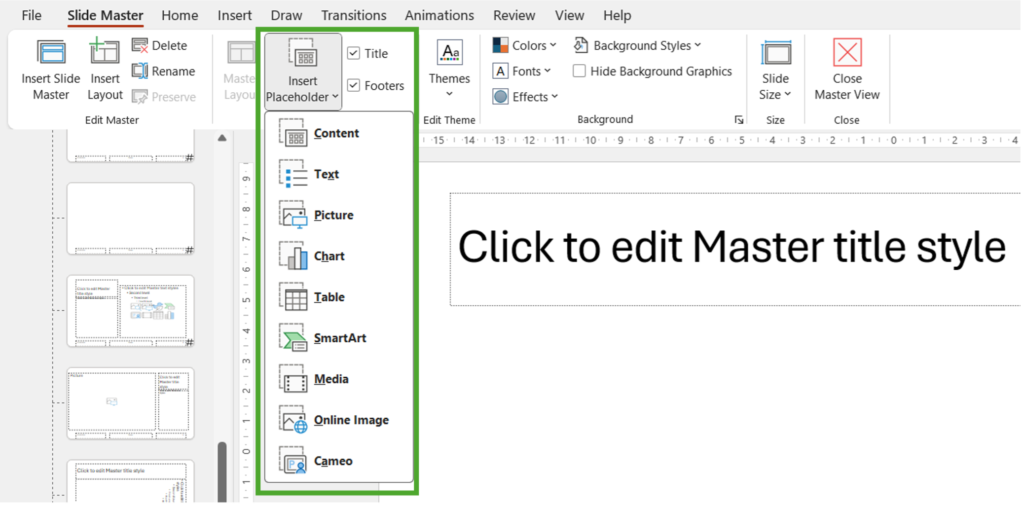
- Customize the layout by moving, resizing, or deleting placeholders. You can also add new placeholders, such as text boxes or picture placeholders, to create the exact layout you need. Use the Insert Placeholder option available in the “master layout” group to add different types of content in your slide
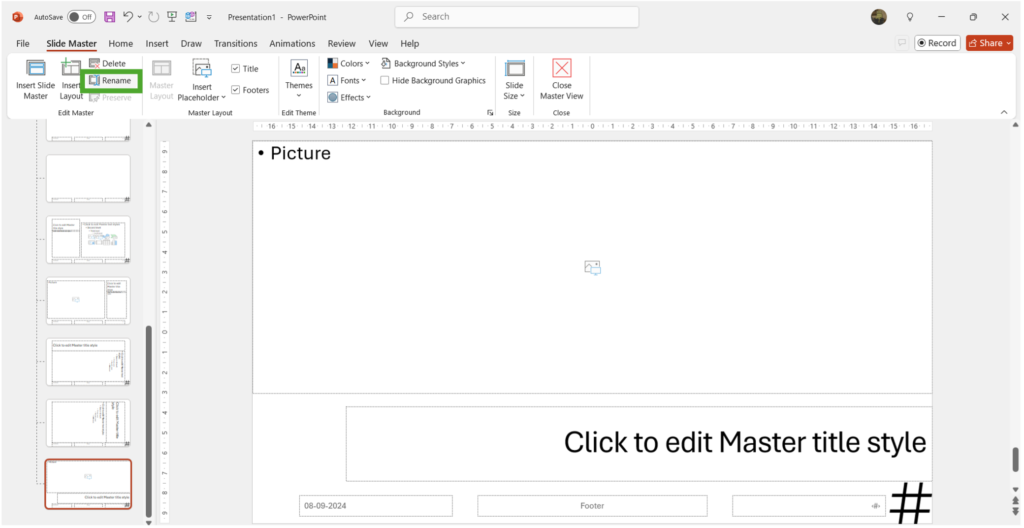
- Once you’ve customized your layout, you can rename it to make it easy to identify later. This custom layout will now be available for use throughout your presentation.
You can now access this custom layout through “Layouts”
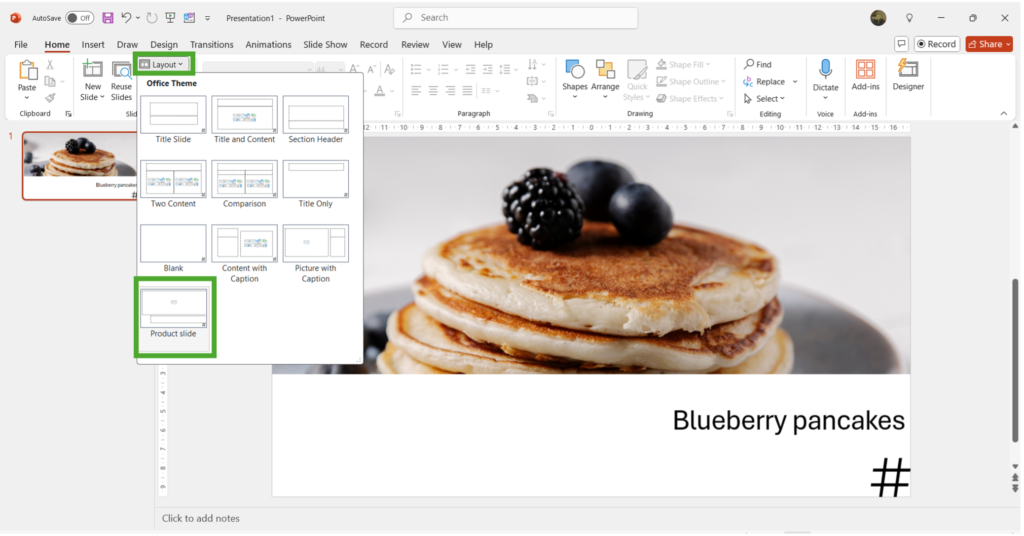
(Slide made using custom layout)
**
Changing slide size with Slide Master
By default presentations are usually made in 16:9 which is the wide format if you want to have the regular standard format of 4:3 ratio or any other custom size
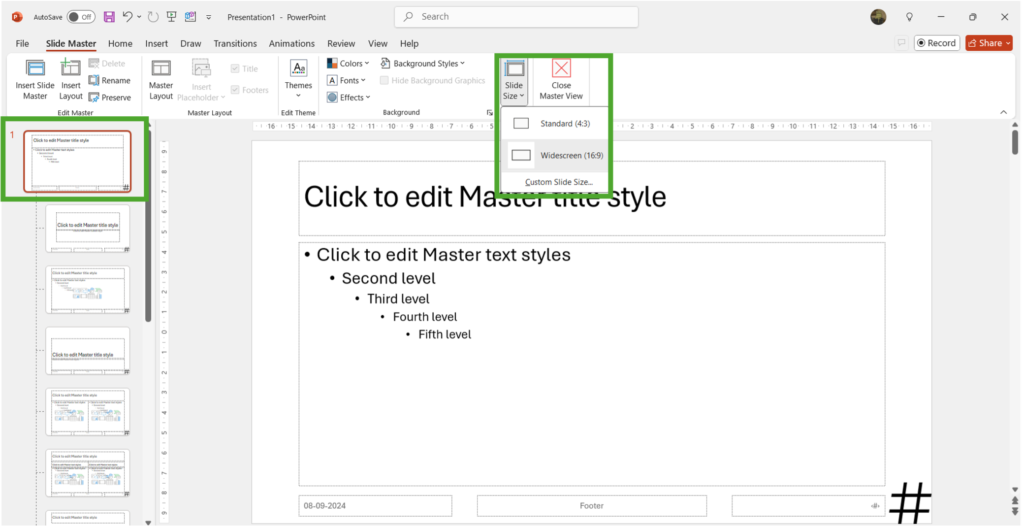
- Open Slide Master View and select the Master Slide.
- Click on Slide Size and choose a Preset Size or Custom Slide Size from the dropdown menu.
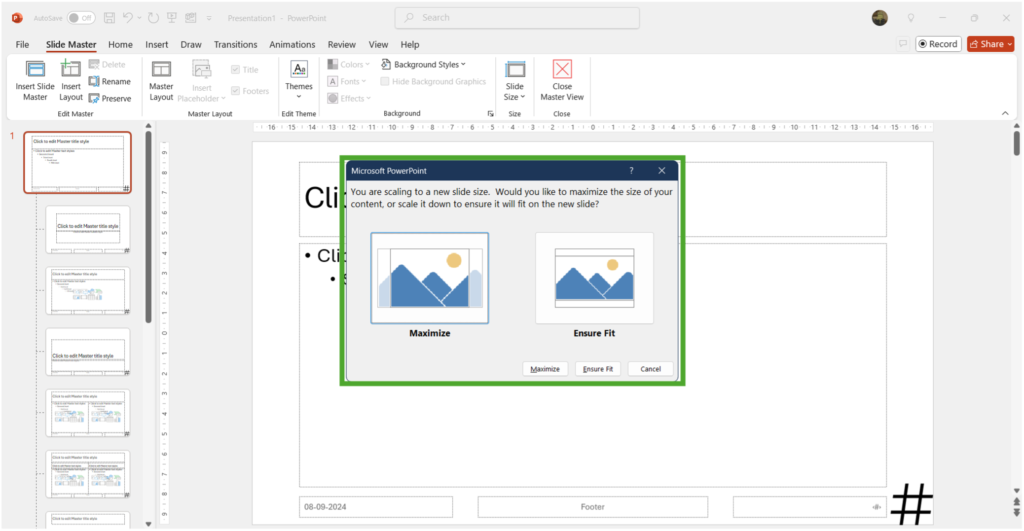
3. PowerPoint will prompt you to choose how to scale your existing content. You can either Maximize (which may crop some content) or Ensure Fit (which may shrink content to fit the new size). Choose the option that best suits your needs.
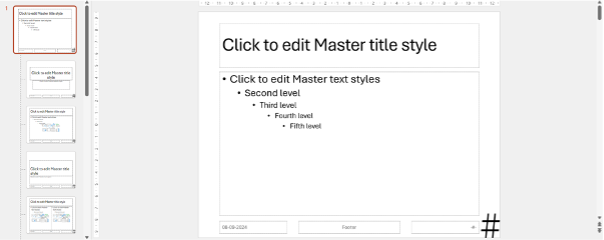
(Slide size is 4:3 ratio)
- After making the changes, click on Close Master View to return to your presentation.
(Slide size 4:3 with ensure fit option)
Pro tip: Changing the slide size affects the entire presentation, so it is recommended to change slide size before you make your presentation as it may be tasking to readjust all your content to fit the size.
**
Saving and Reusing Your Custom Theme
After perfecting your slide layouts, you may want to use them in future presentations. PowerPoint allows you to save your design as a custom theme, which you can apply to any presentation in the future.
To save your custom theme:
- Go to the Design tab in the PowerPoint ribbon.
- Click the drop-down arrow in the Themes group.
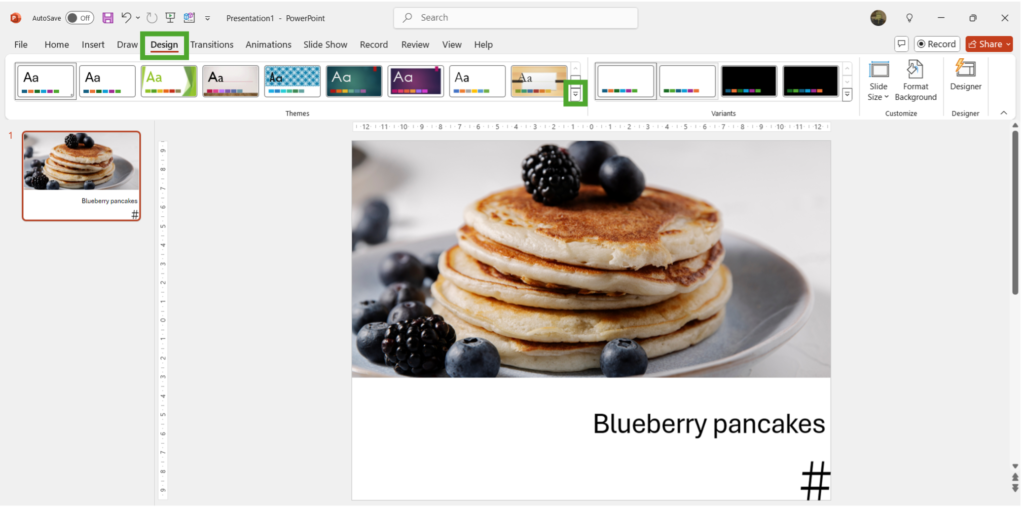
- Select Save Current Theme and give it a name.
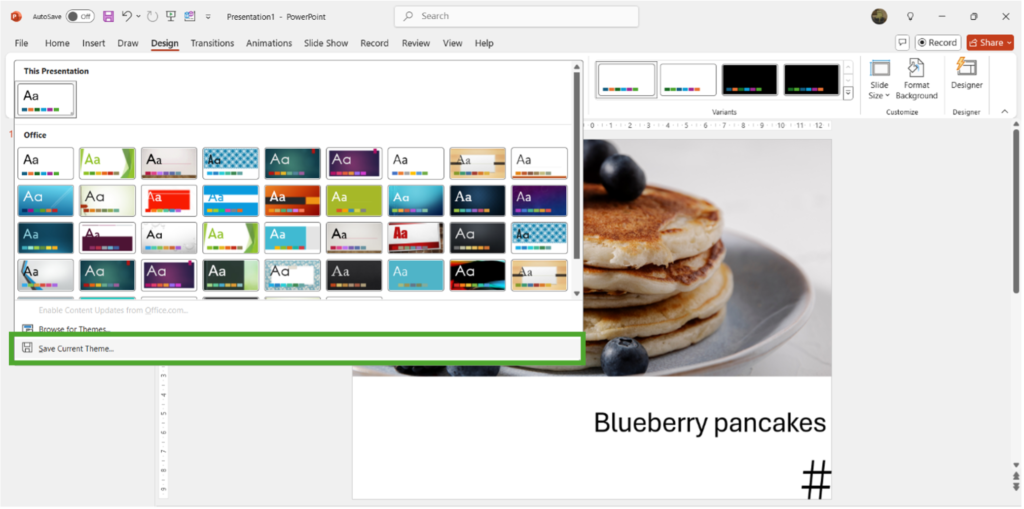
Now, your custom theme will be available whenever you want to reuse it, ensuring that your presentations maintain a consistent, professional look with minimal effort.
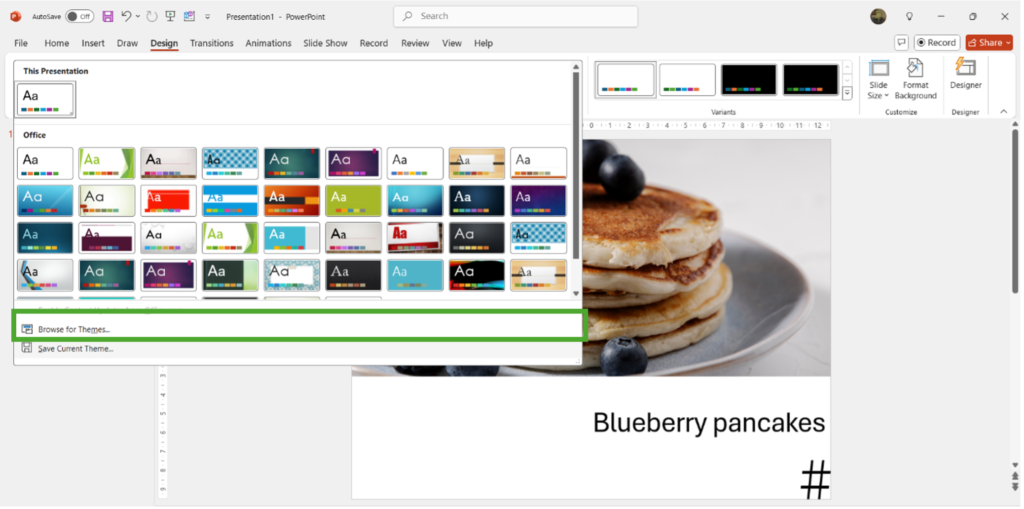
To use your custom theme on new presentations, click on browse for themes and select your theme. This theme will then automatically apply to your presentation.
Conclusion
Slide Master View is an incredibly powerful tool in PowerPoint that offers you complete control over your presentation’s design and layout. Whether you’re adding branding elements, customizing fonts and colors, or creating custom layouts, Slide Master View can save you time and help you create polished, professional presentations every time.
Always start by setting up your Slide Master before adding content to your slides. This approach ensures that all design elements are in place, allowing you to focus on the content itself. Regularly updating and saving your Slide Masters as templates can also help streamline your workflow for future presentations.


