
Have you ever been in a meeting where someone used a transition that seemed a bit amateurish and detracted from the message? Well, the Morph transition in PowerPoint changes all of that. With Morph, you can create subtle and classy transitions that enhance the message you’re communicating. The Morph transition, in particular, offers smooth, visually appealing effects that can transform your slides into dynamic, engaging visuals. In this blog, we will explore what the Morph transition is, how to apply it, practical examples, and best practices to ensure you get the most out of this powerful tool.
What is the Morph Transition in PowerPoint?
(Applicable on Microsoft 365, PowerPoint 2021, PowerPoint 2019 and Google Slides)
The Morph transition is a unique feature in PowerPoint that allows you to create seamless animations by smoothly transitioning between slides. Unlike traditional transitions that simply switch from one slide to the next, Morph intelligently animates the movement of objects, text, and shapes, creating a continuous flow that can captivate your audience.
Benefits of Using Morph Transition
- Smooth Visual Effects: Create polished, professional-looking presentations.
- Enhanced Storytelling: Bring your narrative to life with animated elements.
- Engaged Audience: Keep your viewers’ attention with dynamic transitions.
Getting Started with Morph Transition
Morphing an Object between Slides
1. Insert an Object
Go to Insert, select a shape and place it on your slide.
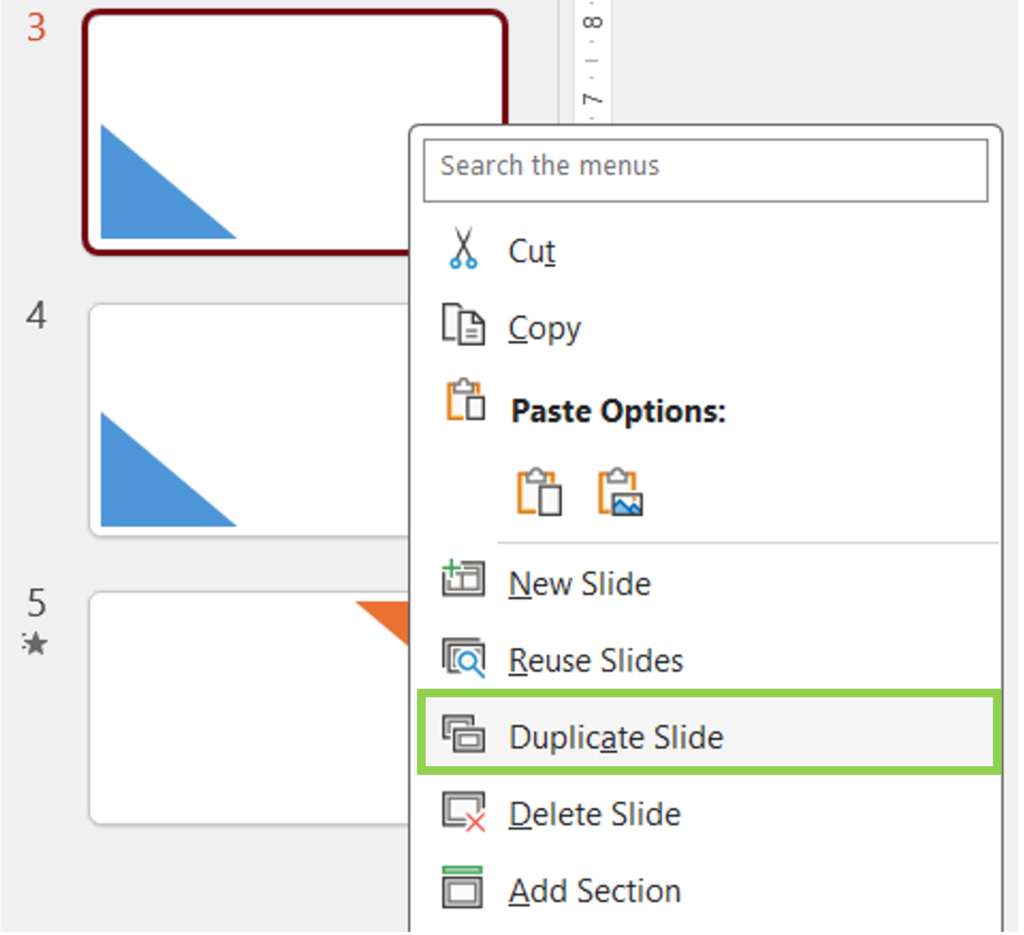
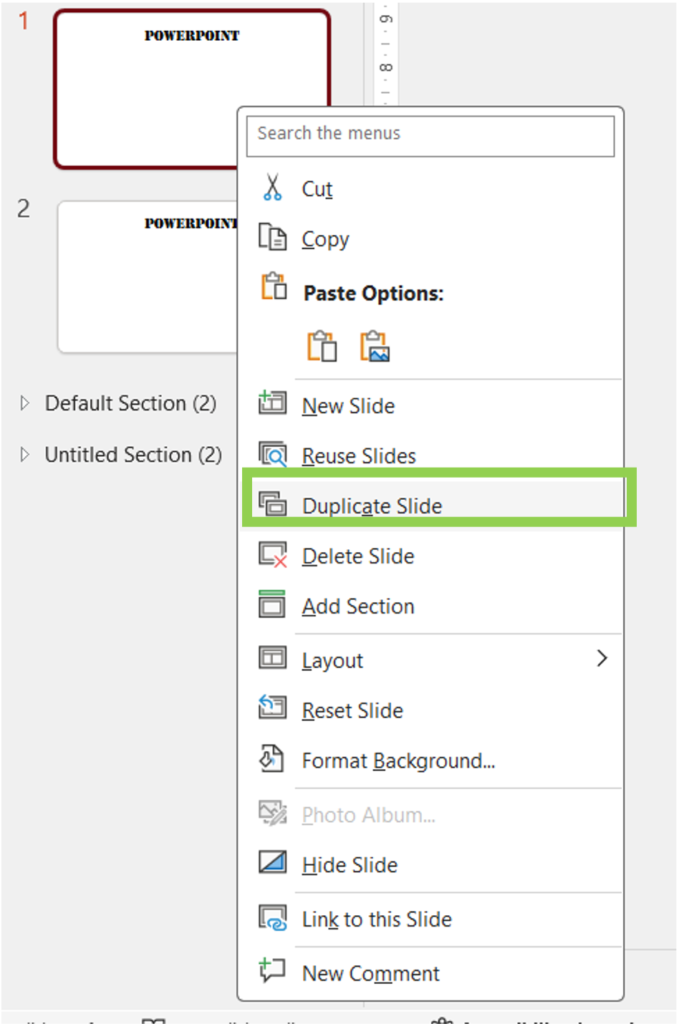
2. Duplicate Your Slide
Click the first slide in the thumbnail pane on the left. Press CTRL + D or right-click the slide and select “Duplicate Slide.” Now you have the starting and target slides for your Morph effect.
Pro Tip: Copy-pasting the object you want to morph to the next slide allows for the same effect. As long as the object is the same between slides, a morph effect will appear.
3. Design Your Target Slide
The second slide represents the final stage of your animation. Resize, reposition, or recolor the shape.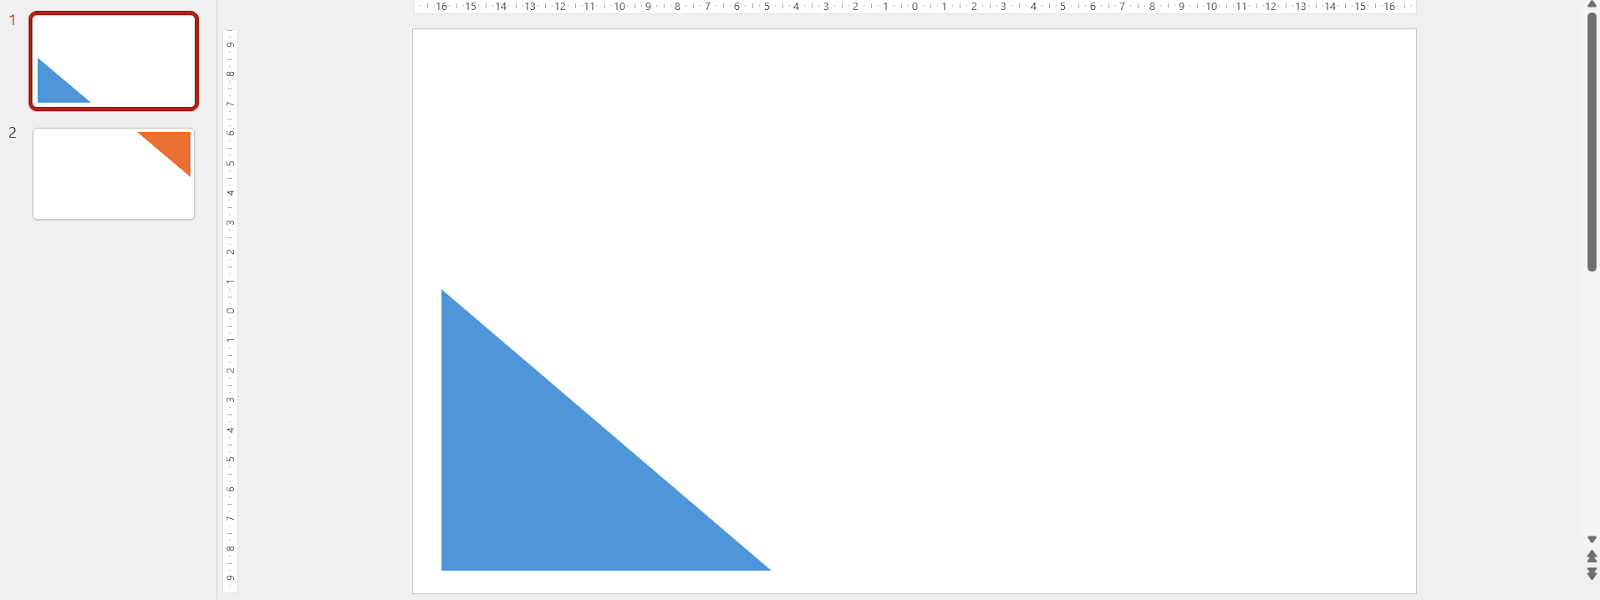
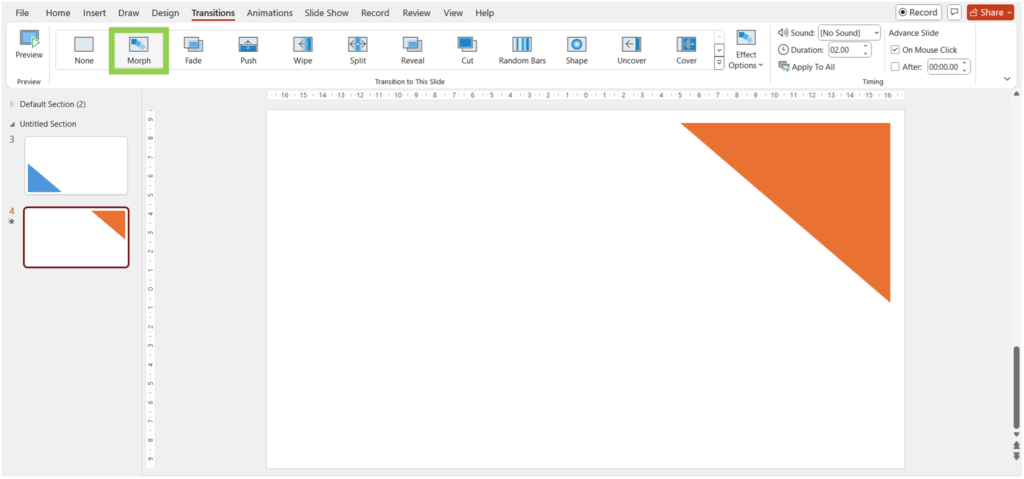
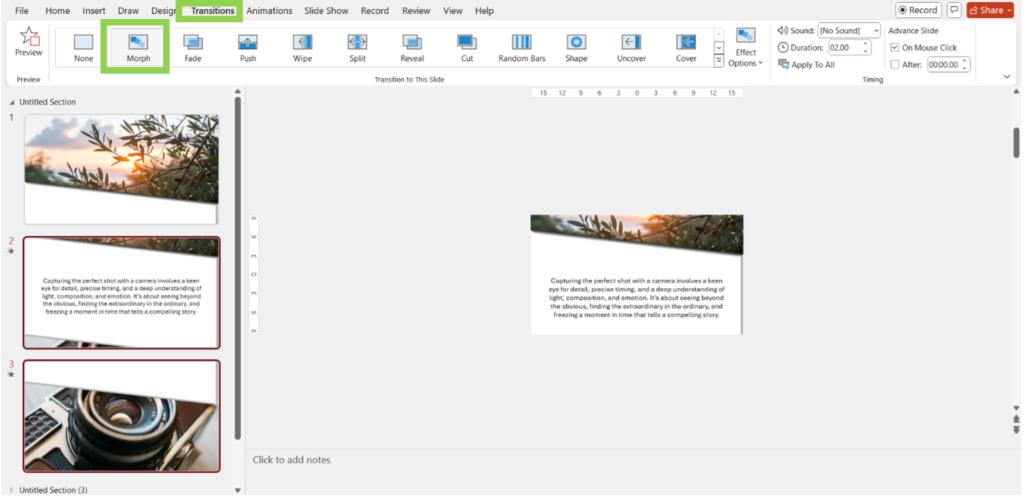
4. Apply the Morph Effect
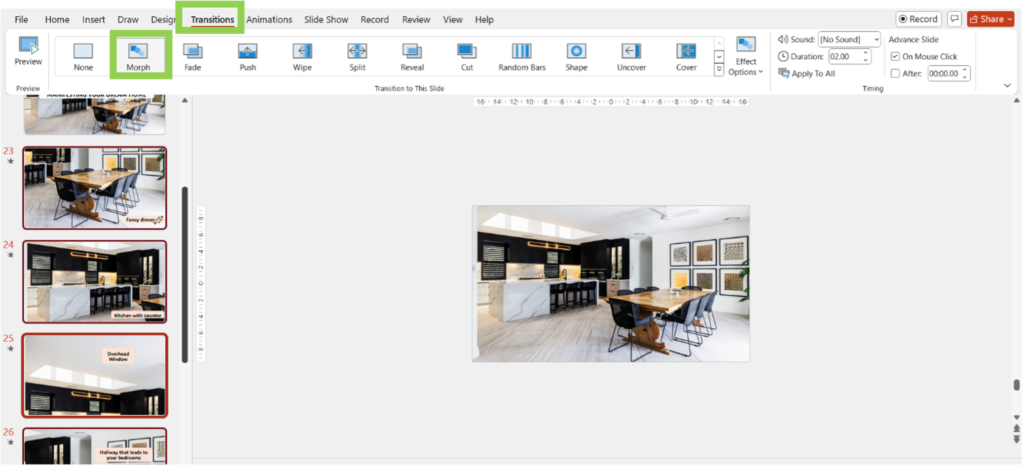
Go to the Transitions tab. Make sure the second (target) slide is selected. Click “Morph” in the selection pane.
Morph effect is set to “objects” by default.
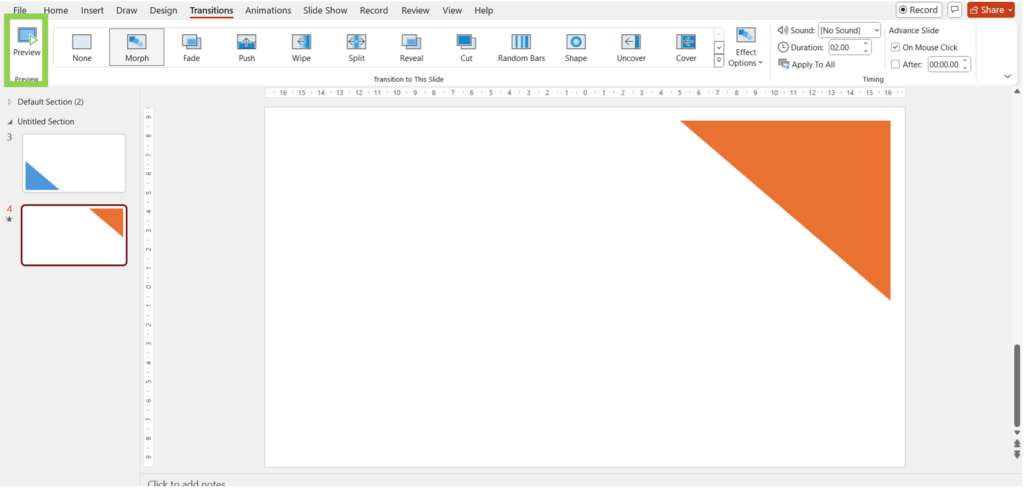
5. Preview Your Animation
Go back to the Transitions tab. Click on “Preview” to ensure the transition is working properly.

Morphing Text Between Slides
The Morph transition in PowerPoint can also be applied to text, allowing you to create smooth animations for individual letters or words. Follow these steps to achieve this effect:
1. Duplicate Your Slide
You can select the slide with the text you want to morph in the thumbnail pane on the left. Press CTRL + D or right-click the slide and select “Duplicate Slide.” Now you have the starting and target slides for your Morph effect.
2. Design Your Target Slide
On the second slide, change the text’s font, color, size, position, and content as desired.
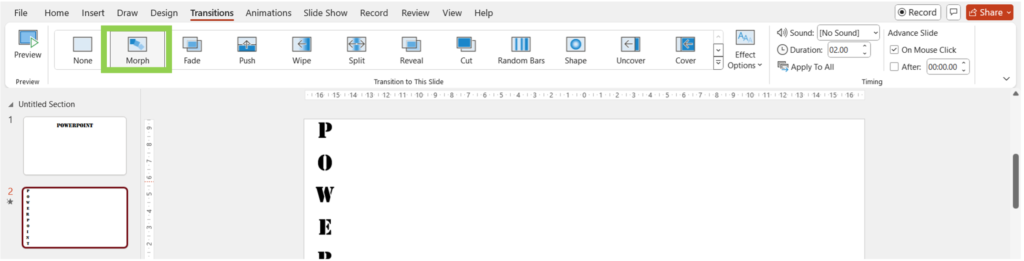
3. Apply the Morph Effect
Select the second (target) slide. Go to the Transitions tab and click “Morph.”
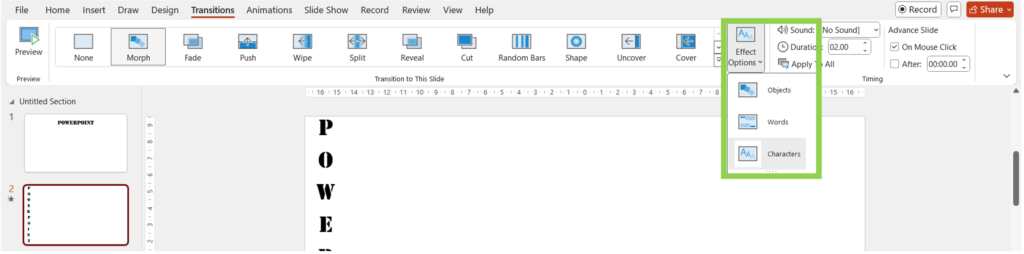
4. Enable Morph for Text
With the second slide selected and the Morph transition applied, click “Effect Options” to the right of the Transitions selection pane.
Choose “Characters” or “Words” from the dropdown menu. This provides PowerPoint with the necessary information to morph individual letters or words smoothly.
5. Preview the animation as below

(Used “characters” effect)
Pro tip: In the Timing group you can adjust the duration of the transition and even add short sound effects.

**
Now that you have learned how to do some basic morph transitions. Let us take it a level forward!
1. Carousel effect in Morph Transition
The carousel effect in PowerPoint is a visually engaging technique that allows you to transition smoothly between multiple images or slides, giving the impression of a rotating carousel.
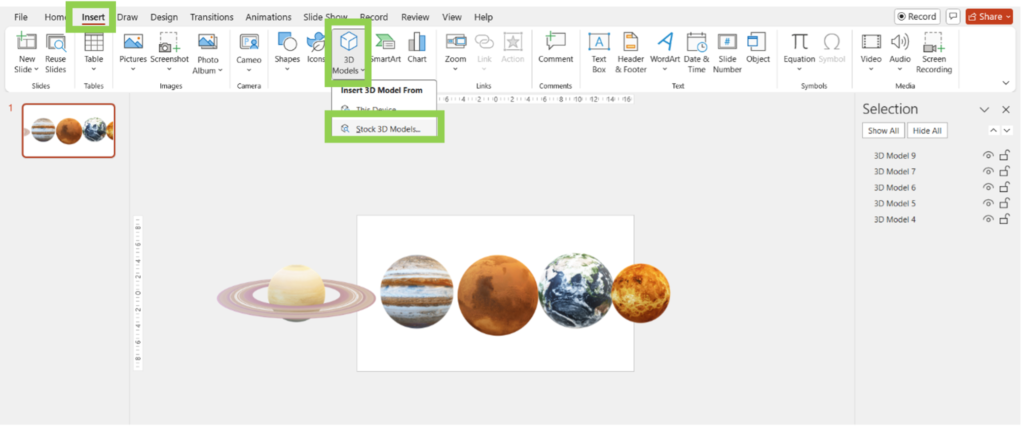
1. Insert Images
Add all the images you need and arrange them in the center of the slide and side by side. It’s okay if the image goes outside of the slide boundaries.
For our example, we imported 3D images of planets from Insert and “Illustrations group” and click on “3D models” and “Stock 3D Model” images, simply search for your object and click on Insert.
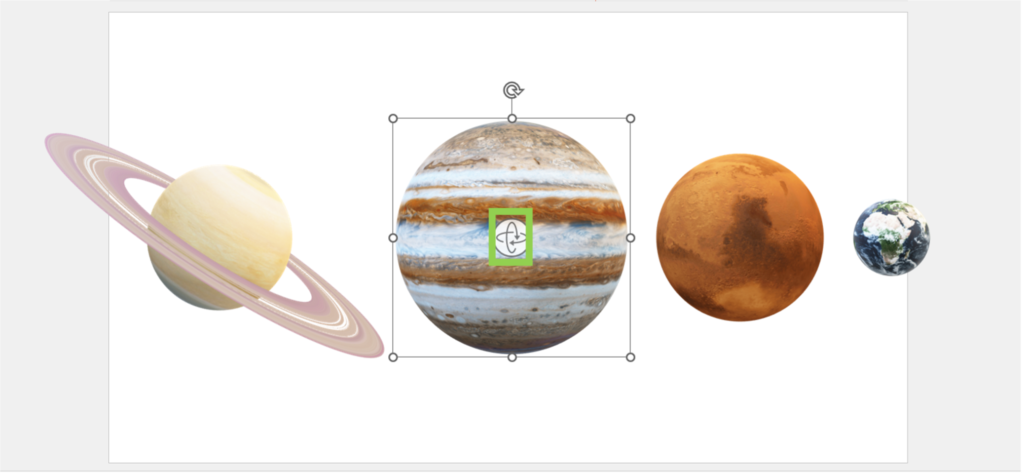
2. Resize and Align Your Images
Make the centred image larger in comparison to others and decrease the size of the other images as we move further from the centre. Align and ensure each image has equal distance in between.
Pro Tip : Use Distribute Horizontally to ensure that each image has equal distance in between.

3. Create Duplicate Slides and Align Images
Press CTRL + D to duplicate the slide. On the duplicated slide, select all the images. Move the images to the left so that the centre of the second image aligns with the vertical guide. Repeat this step for the remaining images.

Pro Tip: Rotate your images slightly to the right to show a special effect while transitioning. Click on the image and click in its centre and drag slightly to the right.
4. Customise your Slide
Insert Text boxes and format your text. Resize and customize images. Add a Background image. Repeat the process for all slides.

5. Apply the Morph Transition
Hold the SHIFT key and select all the slides except the first one. Go to the Transitions tab and click on Morph.
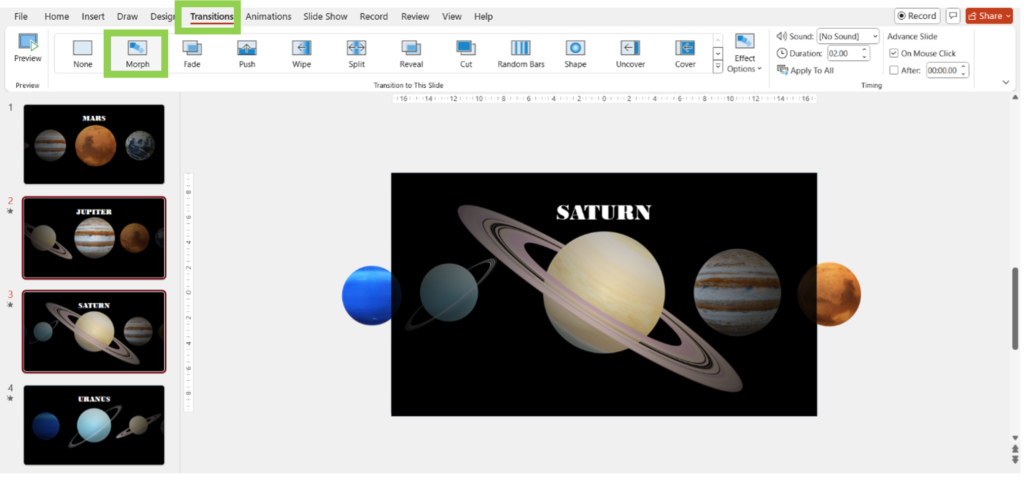
6. Preview and Finalize
Click on Preview in the Transitions tab to see the carousel effect in action. If necessary, adjust the position of images or text to ensure a smooth transition.
Pro tip: Make sure to include the images that are not visible in the main slide because it ensures a smooth transition rather than the image randomly appearing.

**
2. Slide and Zoom Morph Transition in PowerPoint
The slide effect in PowerPoint allows elements to move smoothly from one position to another, creating a dynamic and engaging transition between slides
1. Find and Insert a Large Image
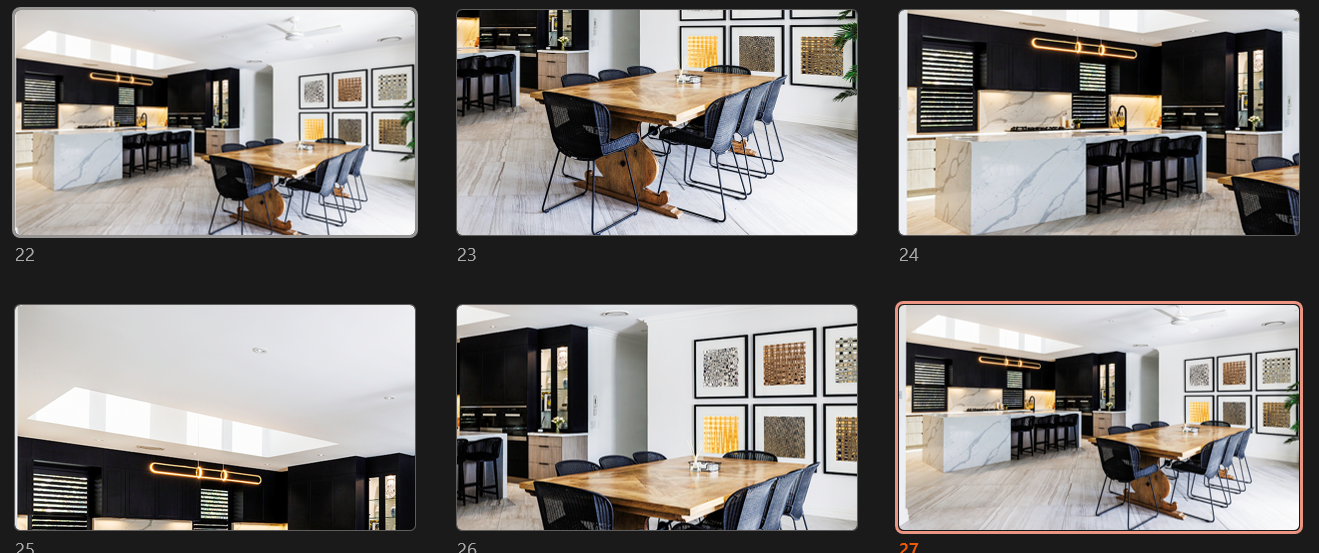
Look for an image that contains several different sections or smaller images within it. Paste the image on your slide. Ensure that your image fits inside the slide.

2. Duplicate your slide and Crop the Image to Show One Section
Click on the slide thumbnail and press CTRL + D to duplicate the slide. Click on the image to select it. Go to Picture Format and Crop. Adjust the crop and size handles to show only the first section of the image you want to display. Resize the image to fit your slide
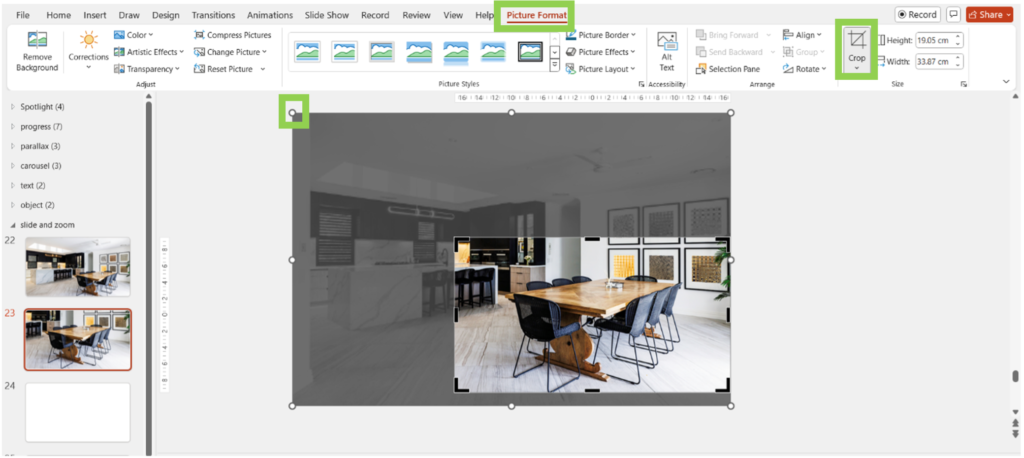
In this crop selection, we have just selected the dining seating area (tables & chair)

3. Repeat Step 2
Repeat the process of duplicating the slide and cropping the image for each section you want to highlight.
4. Customize Your Slides
On each slide, add any text boxes, shapes, or other elements to enhance your presentation. In the image below, we added the area represented in each of the slides.

5. Apply the Morph Transition
Hold the SHIFT key and select all the slides except the first one. Go to the Transitions tab and click on Morph.
6. Preview and Finalize
Click on Preview in the Transitions tab to see the slide effect in action.

**
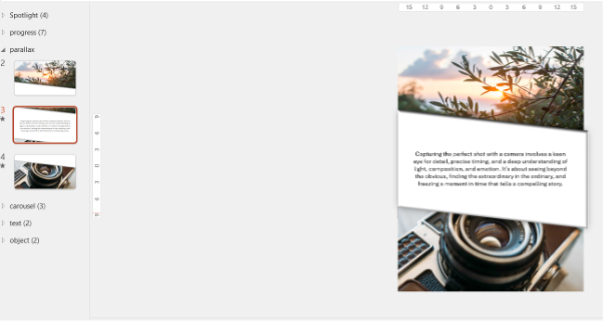
3. Parallax Effect Morph Transition
A parallax effect allows you to create a scroll-type effect. The two elements used appear with different timings to create fluidity in the transition.
1. Insert Image:
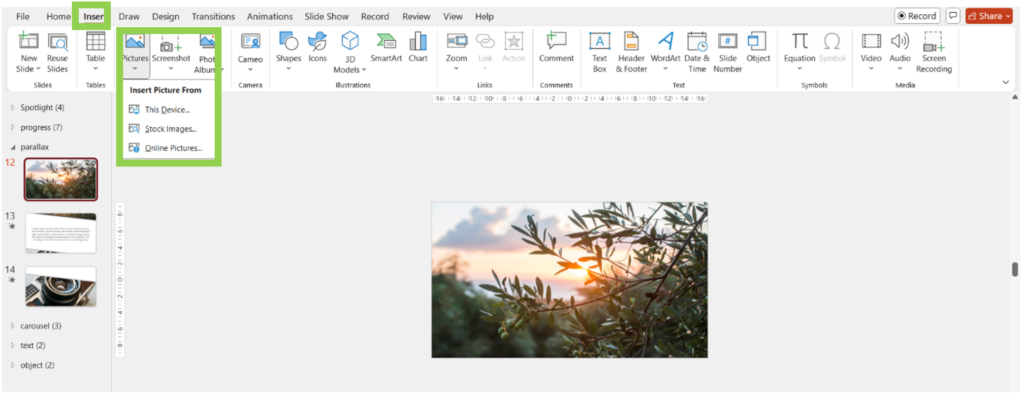
Go to Insert click on Picture and insert an image. Ensure the image covers the entire slide.
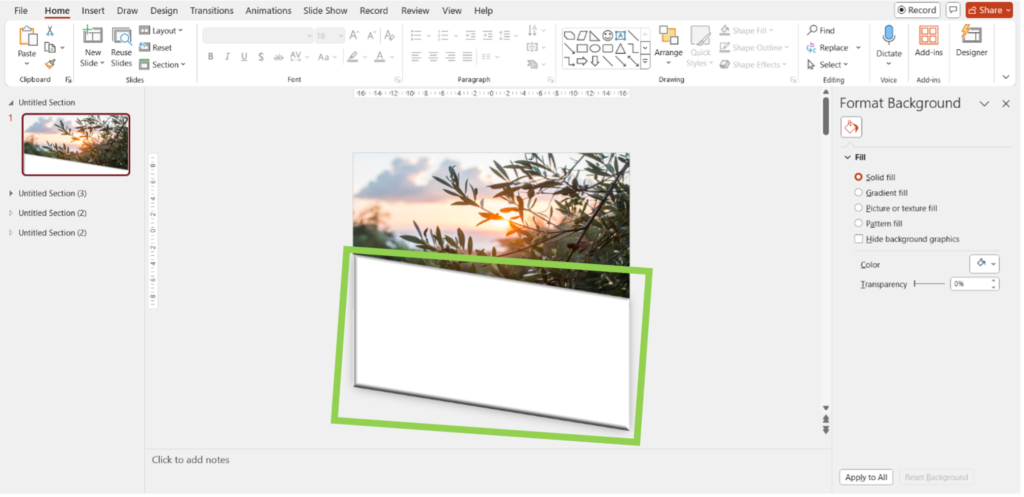
2. Create a Shape on the Image
Go to Insert and Shapes and choose a shape (e.g., rectangle or oval). Place the shape on the image, ensuring it extends beyond the slide’s frame. Insert the second image below the shape. Ensure that the shape is the size of a slide
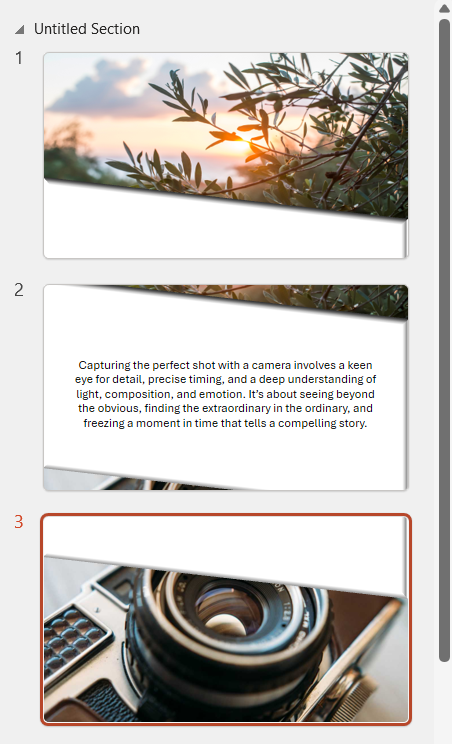
3. Duplicate the Slide
Click on the slide thumbnail and press CTRL + D to duplicate the slide.
4. Position the Shape Below the Slide
On the duplicated slide, move all three objects such that the shape starts slightly above the slide, extending beyond the top edge.
5. Duplicate the slide
Duplicate the slide and move all three objects above until the second image covers the slide.
6. Apply the Morph Transition
Select the slides (except the first one) where you moved the shape. Go to the Transitions tab and click on Morph.
7. Preview and Finalize
Click on Preview in the Transitions tab to see the slide effect in action. Toggle with the timings if needed to make it smoother.
![Untitled video (9).mp4 [video-to-gif output image]](https://lh7-rt.googleusercontent.com/docsz/AD_4nXe_MqJX6i_fcRleRqIzeBRsNqYyK6r2Lj_xCYfC-yl9aXWbqS9U8WtVn34EWYbZAj9G2XC80qqsrhZkGyduzbWM7WGjWkbp99cLDxjhUJyrLZvUFRoXQmPwvw0u8m1dLUsdcBn6CTgT30u3hJo2ntQSKWRca3OSAQTk2N2V4aMm50Cnkjs8kTE?key=05t_QdFSmTMf2jcQY_KMfQ)
**
4. Progression Bar Morph Transition
1 : Add Titles for Each Part
Create text boxes for each title on the new slide that represent different parts or chapters of your presentation. Arrange objects in PowerPoint these titles vertically or horizontally, as per your preference.

2. Place a Rectangle Behind the First Title
Go to Insert and Shapes and select a rectangle. Place the rectangle behind the first title by dragging it and resizing it to fit behind the text. Right-click the rectangle, and go to Send to Back to place it behind the title text.
Change the fill color of the rectangle to highlight the title (e.g., a light color that contrasts with the background).

3. Copy and Paste
Select all the tiles and the rectangle and copy (Ctrl + C) and paste (Ctrl + V) it on the next slide
4. Change the Rectangle’s Position
On the duplicated slide, move the rectangle to highlight the next title. Adjust the size and position of the rectangle as necessary to ensure it fits well behind the new title. Repeat steps 3 and 4 for all the remaining slides.

5. Apply the Morph Transition
Go to the Transitions tab. Select all the slides (except the first one) and click on Morph. Choose Objects in Effects

6. Preview and Finalize
Click on Preview in the Transitions tab to see the slide effect in action.

**
5. Spotlight Effect Morph Transition
A highlighted area draws focus to specific parts of your slide.
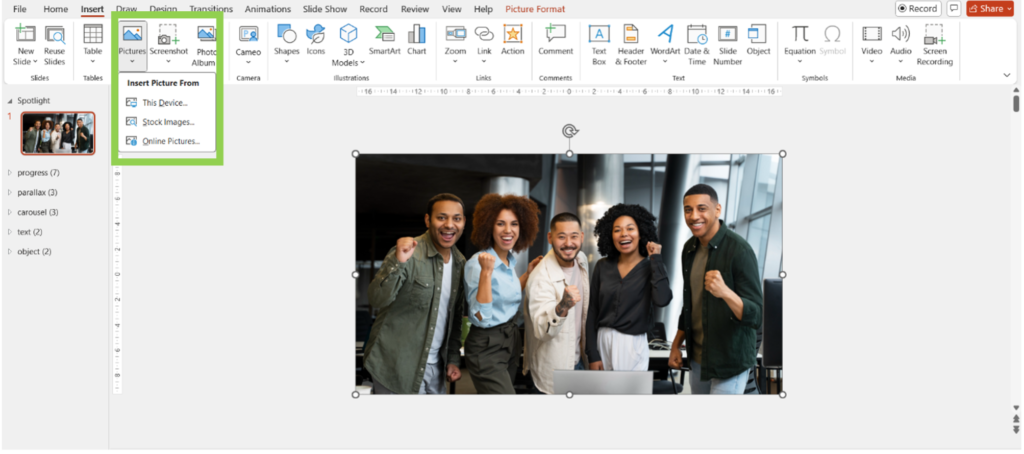
1. Create the Initial Slide
Go to Insert and Pictures and select an image. Resize and position the image to cover a part of the slide.
2. Duplicate the slide
Click on the slide thumbnail and press CTRL + D to duplicate the slide.
3. Duplicate the Image
Duplicate the image by clicking on the image and pressing CTRL + D. We are now working with two images.
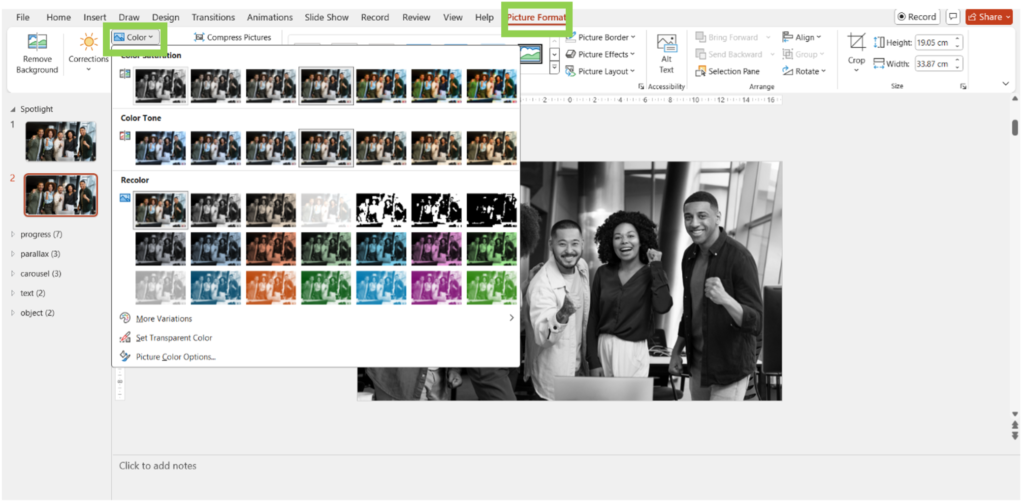
4. Desaturate the original image
Click on the first image to select it. Go to the Picture Format tab. Click on Color and select Grayscale or another desaturation option to make the image faint.
OR
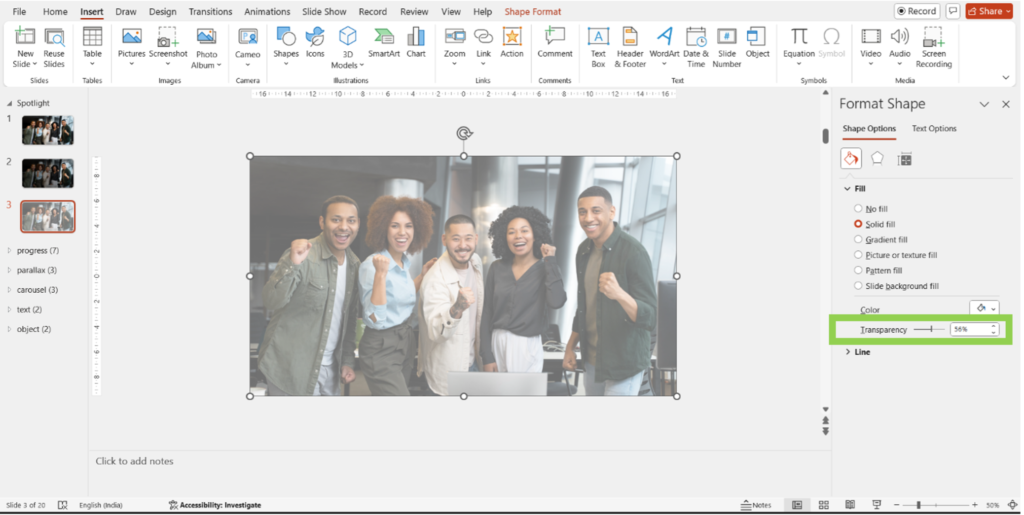
Add a Semi-Transparent Overlay
Go to Insert and Shapes and select a rectangle. Resize the rectangle to cover the entire slide. Right-click the rectangle and select Format Shape. In the Fill options, set the color to white or black color. Adjust the transparency to around 50-70% so that the content is visible through the overlay.
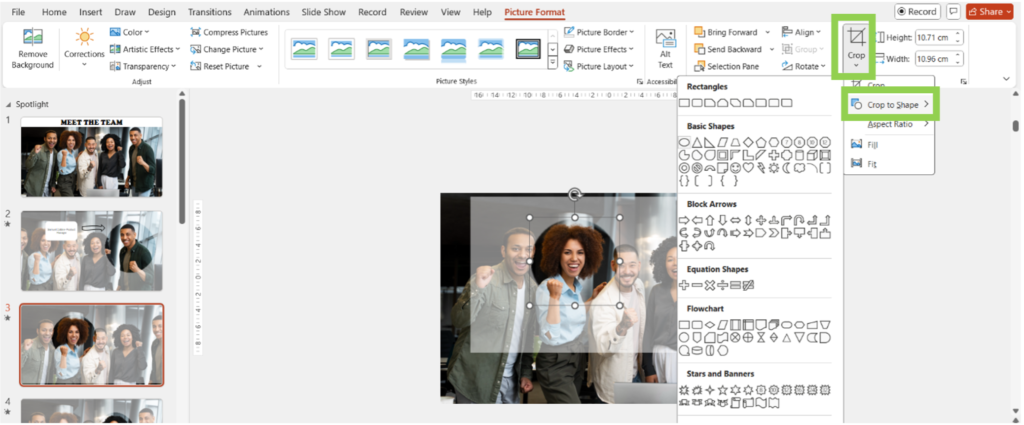
5. Add Colored Cropped Image
Click on the duplicated image to select it. Go to the Picture Format tab and click on Crop. Resize and move the cropping handles to focus on the team member’s face or another area of interest. Experiment with “Crop to Shape.” For example, we used “crop to shape, circle” to highlight my fellow members.
6. Repeat steps 2 to 5 for all your members
7. Customise the slides
Insert text boxes and format your text. Resize and customize shapes. Repeat the process for all slides.

8. Apply the Morph Transition
Go to the Transitions tab. Select all the slides duplicated slides (except the first) and click on Morph.
8. Preview and Finalize
Click on Preview in the Transitions tab to see the slide effect in action.
![Untitled video (12).mp4 [video-to-gif output image]](https://lh7-rt.googleusercontent.com/docsz/AD_4nXd0j3Gcdc-Wr9fqv2lz73pVVy7eHqdJPwRPbIpa5SIFLqOV-5tKndnN2x4jFucR6x_pUJbvsLJgOyTJoiEROLIWsDkur2uaDa4lgkfUg6Jq97o7pSqfvkdoxapz517vYgfqET2tLDvAHMhw4-dF-AEUlZ5HkPj-ldCwGavsS4bM8N1rPeEpwgA?key=05t_QdFSmTMf2jcQY_KMfQ)
Conclusion
Whether you’re aiming to create seamless animations, engaging visual effects, or dynamic transitions, the Morph transition can help you elevate your presentation game to new heights. By following the step-by-step tutorials provided in this blog, you can easily apply Morph to objects, text, images, and more, ensuring your slides are not only informative but also visually appealing presentation and captivating. So, go ahead, experiment with different Morph effects, and make your next presentation stand out with professional, polished, and engaging transitions. Your audience will thank you for it!

